Sunday, August 30, 2015

PTI Stamp-a-Faire 2015: Thread Challenge

If you've been following me, I've been working and playing along with:
Next up is:

I have a confession to make: I tired to make these thread nests... yeah, no good. NO GOOD AT ALL! I'm really terrible at making these thread nests, soooo change of plans. I decided to use thread to hold a hanging item.


By having this hanging item, I can have the inside sentiment stamped on the back of it and leave extra room for me to write to the receiver of this card! This turned out better than I thought!


I went for a rustic look of this card: mail/postage.

PTI Stamp-a-Faire 2015: Patterns Challenge

I'm still on:

The next challenge we tackled was:

"Create a card using one of the above twelve sketches as your inspiration."  The sketch I chose was this one: 

And my result:

And the inside:


This card is fun and festive! Good for any age and gender! I can't wait to send it out!

PTI Stamp-a-Faire 2015: Bridal Challenge

I just spent the past 24 hours with Ashley, inside her craft room, working on PTI Stamp-a-Faire challenges. 

However, I have not completed them all nor will I finish them all. PTI's deadline is by this coming Tuesday. The next few blog post will totally be all about these projects. All these projects are based on a fashion theme. 

It was 8:00 am, my brain was slowly waking up to this first challenge:
"Create your own wedding project utilizing nothing but the color white." This was a tough one to start the day! Initially, I thought, "I can't stamp white-on-white!" Rough start... but thankfully, Ashley just picked out a random wedding stamp set and said, "Here, use this," and got the ball rolling. This was the result:


The two cards are similar in design, but the embossed background and layout of the leaves are different. The is a shimmer on the leaves; I sprayed the shimmery alcohol concoction from Ashley (I believe it's from Stampin' Up). I think these cards are also an excellent choice for Simon Says Stamps Wednesday Challenge: Anything Goes


I love the gold embossing for the sentiment. The combination of white and gold give these cards a very elegant style.

Wednesday, August 26, 2015

Sparkle & Christmas

I was blog hopping and came to Happy Little Stamper August Christmas Challenge page. Their theme this month is "SPARKLE." How perfect~ I just reorganized all my paper supplies and knew exactly where all my sparkly, shinny papers were! And this was the result:


Christmas seems so far, yet so close! I'm looking at the calendar, and it seems like holiday craft shows are starting soon! This card is also good for Simon Says Stamp Wednesday Challenge: Anything Goes


I used PTI's Wonderful Words: Holiday Die for the "merry" and added "Christmas" from a different stamp set. I used the same die cut, "merry," on red glitter paper and some fun foam. This way, I was able to give the text some dimension. For more sparkle, I added some more sequin for bling. 


Side note: My Etsy store is coming along. I'm still working out the details and organization. Will do some posting about that soon. Thanks for stopping by!

Sunday, August 23, 2015

Last Summer Birthday For Now

This is the last birthday card I'm making for the summer. I can't believe fall is just around the corner!

Papertrey Ink is one of my favorite stamp company! And following their Make-It-Monday blog, I did the technique Ashley had mentioned, "Masking Sentiments." I made this card following the technique (Make-It-Monday #221):


I used the same design and technique for both cards. Except one is for a birthday and the other is for a thank you card. The color scheme I chose was on purpose to match Simon Says Stamps: Monday Challenge: Citrus with a Twist. Here's another look:


I totally messed up on the birthday card... it was really hard to match the stamps up correctly. :( Oops...

Friday, August 21, 2015

Summer Birthday continues

My sister just moved out recently, so we are in the transition of spaces currently. Despite leaving soon again for school, my brother moved into her "old space," while I'm moving my crafty things into half of his "old room." I never had a "craft room" before, this will be first to have a designated space to work! Pictures to come soon!

Anyhow, I'm continuing onto more summer birthday cards:


This card is a fit for Simon Says Stamp Monday Challenge: Citrus with a Twist.  I promise you that the yellows are much more vibrant than what it appears in the picture. It's the same stamp set I used in a previous card/post. However, this time I left out the coordinating dies and just left it to good old stamping. Additionally, the "Happiness" sentiment is embossed. And finally a red fold trim pulls the the two panels together.

stamps: garden gild (PTI)

Monday, August 17, 2015

office supplies meets crafting


Ok, a short break from birthday cards for now... Actually, I'm posting a short tutorial! :) Just keep reading!

It's back to school season again! This means, it's time to buy office supplies for cheap. I don't know about anyone else, but sticky notes is a necessity on my desk. So I went out and bought a bunch of sticky notes.


Then, on Pinterest, I stumbled upon Nancy's blog and thought these note pads (to the right) were so cute! So I made a version of my own.

Instead of using legal paper pads, I used my new purchased sticky notes. And I made these:


I think I'll sell these at the next craft show! Notice the cupcakes on on some of them. I thought those were perfect for Simon Says Stamp: Wednesday Challenge: Food and/or Drinks. So the sticky note pads that I got were 3"x3" and about 50 sheets (thin pads). First I inked up the sides using Distress Ink. 

(This particular one that I'm showing you is perfect for Simon Says Stamps: Monday Challenge: Citrus with a Twist. I love this distress orange shade - dried marigold!) Then I took some pattern paper and cut them into 2 - 4"x4" squares. These are the covers of the note pad. Next, I cut thin chipboards to 2 - 3.25"x3.25" squares and 1 - 0.5"x3.25" strip. I didn't have chipboards so I used a mailer instead. It worked out great! For the inside, I cut a 3"x7" strip. Lastly, for the outside binding, I cut a 1.5"x6" strip; scoring at every 0.5" vertically.


Now that I had all my pieces, I can assemble! You can use any wet adhesive or tape. It doesn't really matter; I used both. First, the covers: I adhered the squared chipboards and pattern paper together. Then, laid them onto the outside binding. Between the covers, I laid the 0.5" strip of chipboard in the middle. Please see picture below:


To add a pop color, I used some ribbon. (This is optional, you don't have to do this.) I flipped what I had assembled so far and adhered the ribbon. 


Then I flipped it back again and folded the excess binding paper and ribbon towards the middle. More  adhesives were added along with the inside paper. At this point, I would take my bone folder and rescore the score lines from the binding piece. Except, score it from the inside. Make sure to fold along the score lines to help the papers bend properly. Now the entire cover is done; just let it dry a bit. Now it's ready for the sticky pads. I took the back of one of the pads off and stuck it right on top of the other. 


Using some Scor-Tape to the back, I added the pads onto my cover piece. And now it's done! You may choose to embellish the front as you please. I had so much, I took on a new challenge, using the same concept and made a legal note pad cover as well. (You can see all the sticky pads in this picture too!)


This legal pad can be replaceable once it is used up. I believe that many Stampin' Up demonstrators has videos and other blogs that has similar tutorials like this. I encourage you to go check them out! 

We'll be back to summer birthday soon!


Sunday, August 16, 2015

Summer Birthday - 2

I'm continuing my birthday card adventure here:


I followed the Simon Says Wednesday Challenge: Food and/or Drinks theme. I thought the sentiments of this stamp set was suitable for both children and adult. Cake and ice cream!? If you don't like one, you ought to like the other! :p I can use this card for anyone!

I'll have more birthdays to update soon! Thanks for stopping by!

Monday, August 10, 2015

Summer Birthday - 1

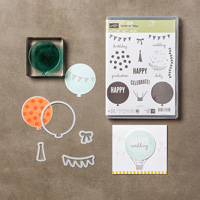
I got the Stampin' Up Celebrate Today stamp set a while ago. However, I haven't really done much with it until recently.

I'm in major need of birthday cards. This stamp set is perfect! I pulled out all my SU colors as well. This card is perfect to match Simon Says Wednesday Challenge: Tie It Up.


I popped up each balloon with some foam and tied some white twine to the ends. I think the embossed background gives a "fun" atmosphere. AND I can use this card for a boy or girl! Stay tune: more birthday cards to come!

stamps: Celebrate Today (SU)
colors: hello honey (SU), coastal cabana (SU), crisp cantaloupe (SU)